Monday, May 31, 2010

Distressing Goodwill Wooden Frames


If there's one thing Goodwill and the Salvation Army have a lot of it's photo frames.  Anything from a small wallet sized frame all the way up to poster size, they've normally got it.  I'm in our local Goodwill about once a week and I am always looking for unique or unusual, or vintage photo frames.  I never have a whole lot of luck.  Normally you just wind up with the cheap wooden versions you can buy at Wal-Mart or Dollar General for just a dollar or so over what Goodwill prices them at.


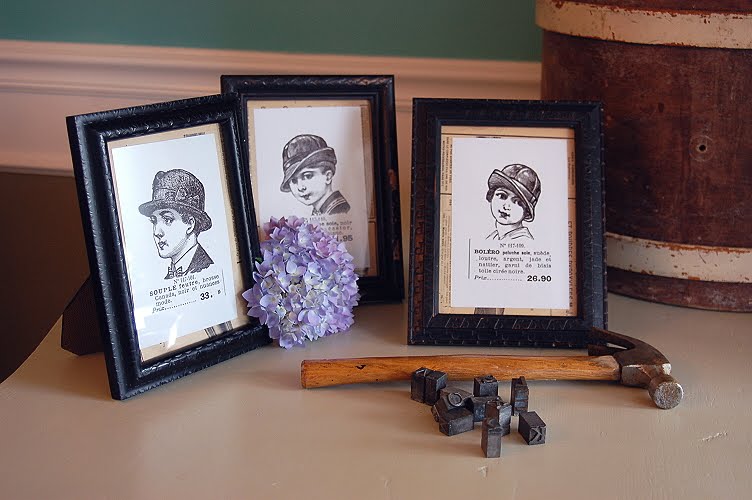
A few days ago however I got the idea to distress these new, cheap frames to give them some age and character.  Using some metal type setting blocks that we picked up at the Flea Market a year or so ago I just pounded some repeating letters and numbers into the edges of the frames.  Of course I removed the backing, image, and glass first.  Then using a small hammer I just used the printer blocks to create some great details.  The repeating of a single letter or number all the way around the face of the frame sets the tone.  A sharp, swift, but not too heavy pop of the hammer will leave a good image of the printer's block letter on your wooden frame.  Make sure they are wood.


After repeating the letter pattern all the way around the faces I went back and added letters to the sides of some of the wooden frames.  Once that was complete I used a clear furniture wax to cover the fresh black paint I had put on the frames,  you can skip the painting step by selecting frames that are already the color you want.  After letting the wax haze over I buffed it for a great, semi-shiny, vintage look.  The imagery I am using in the frames are from a vintage dry goods catalog circa 1920 or so from France.  I have several pages from the same catalog on sale as digital downloads in my Etsy shop.


Have a look and let me know what you think, also let me know if you decide to try this project.  I am here to answer any questions you may have about the process.  I might add some of these to my etsy shop, or even some of the metal letters for you to make your very own. 

I'm currently assisting Mrs. Hughes in setting up her first market booth.  She will be carrying several items upcycled by yours truly, including some awesome mini-journals covered in vintage Victorian calling cards.  Check out her blog for photos from her market booth coming at the end of this week.


More Soon, The Upcyler

Thursday, May 6, 2010

And this week's obsession is?

Wardian Cases, Curiosity Cabinets, Kunstkammer, Wunderkammer, Cabinets of Wonder, whatever you call them I'm into them.  So much so that I've set aside all of my other pet projects, and Mrs. Hughes will tell you there are several, to focus on this one.  Mrs. Hughes pointed me to an odd etsy posting a few months back that was offering a Victorian curiosity cabinet.  I hadn't really heard of them so I looked them up:
http://en.wikipedia.org/wiki/Cabinet_of_curiosities very cool, if somewhat macbre.  I thought it would be fun to try to make one of my own.  While searching for items to place into my Cabinet of Wonders I noticed that there aren't that many people doing them, and almost none for sale online that cost under $300 or so.  So, since I went to all that trouble finding all of the sources from feathers, to emu eggs, to odd sea shells and the like I decided to just order some additional items and create some cabinets for resale.

So I've got stuff coming in, and I've figured out how to fit upcycling into the whole thing.  While staring off into spaces and trying to think up a cheaper alternative to shadow boxes or plastic cases I got the idea that a cigar box might work as a base and a lid for a case.  I didn't have one in the house but I did have a little curio or jewelry box that is made the same was as the nicer wooden cigar boxes.  The lid fits over the bottom of the box.

After learning how to cut glass online I cobbled together my first cabinet.  A fairly simple undertaking really, besides cutting the glass which is a real pain in the butt.

 If you look close you can see the keyhole and clasp from the jewelry box.  The blue stuff is painter's tape.
I used that to hold the glass in place while adhering everything.  It's been a learning process but I think these will turn out great.  I've got some unusual items coming in as well as some cigar boxes to create several of these.  I will do another post as soon as I have a couple created.  I will be selling them on Ebay, Etsy, and off of a website I am working on.

Here are a few images I found online.  My cabinets are going to be less dark, no skulls or mummified things.  And if I use bugs and the like the will be casts, you have to have a special license to resell dried insect specimens I've discovered, so I would rather avoid that.  I hope to re-create some critters though by upcycling some items, we will see how that works out.

More soon!
The Upcycler